Here’s the first part of a new series I’m going to be starting up. The series will be called “How to photograph sports” and will be an in-depth look at positioning, hot spots, action and key moments. I shall be covering as many sports as I can over time, I’ll be starting with rugby today and will hopefully move on to hockey (field hockey), basketball, football (soccer) and GAA in due time, but you’ll have to bear with me as I invest time in gathering enough information about photographing these sports to make this a worthy read. The reason I’m doing this is because I spent a long time looking for information online about positioning when photographing sports and I couldn’t find information about anything other than baseball and american football – absolutely useless to me as I live in Ireland. I’m hoping to use this to help amateur photographers go to their first games with more confidence or improve their photographs with ease. So, lets get into it.
Rugby
To stand or not to stand?
Unfortunately rugby is a sport you really need to sit for, or at least kneel/crouch. I’ve taken some great photos that I’ve only been crouching for but I’ve never particularly liked anything I’ve been standing for. I’m 6’3″ so I’m close to eye-level with most rugby players. When you stand, horizons tend to be higher and often heads get cut off. Example:
 To be able to keep the players’ feet in the shot I’ve ended up cutting off all the heads in the background which makes for an extremely distracting background. If you’ve ever stood on the sideline of a rugby match then this photo will look very similar to what you’ve seen with your own eyes. You can see that you’re looking down on the players and they look smaller because of that.
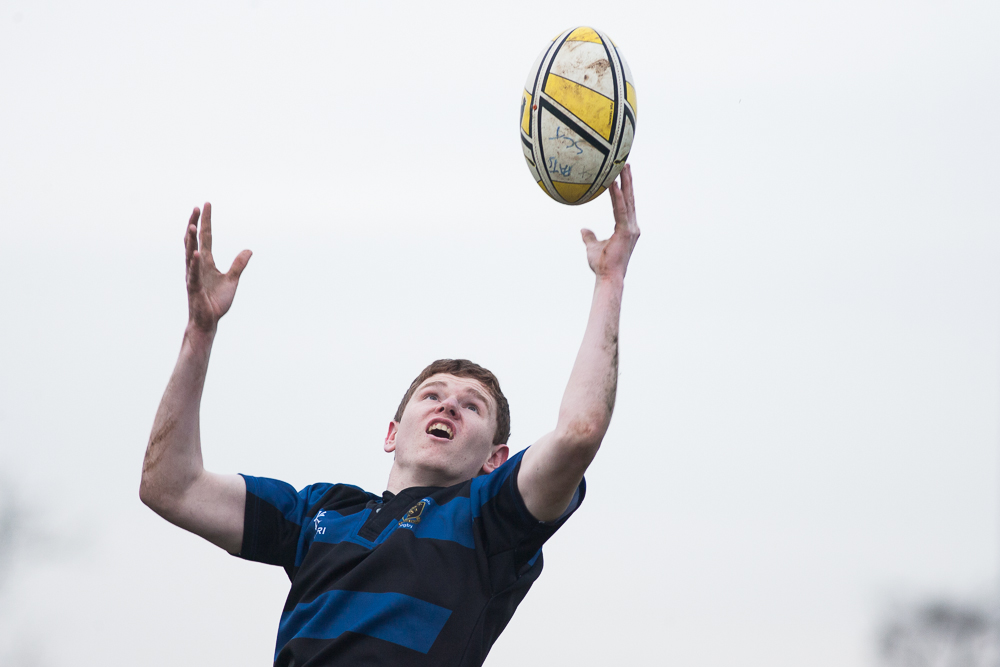
 Now, here, as I’m sitting you can see that the horizon is significantly lower and all the people can be seen in the background (I know they’re further away, but it’s the best example I have). This positioning makes the players look physically bigger which is what our aim as photographers should be. Our aim is to make people look as good as they can (most times…), rugby players are known for being big and built so it’s important to get this across in the photo. You need to show them from a perspective that people don’t generally see, this helps to make your photos more eye-catching.
So I 100% advise that you should sit, kneel or at least crouch when photographing rugby. For the most part, I sit on my Peli 1510 case that I use to transport my gear (you can find my review of that case here). I don’t like to sit or kneel as it typically makes my jeans quite dirty due to the weather here in Dublin causing the ground to be soft most of the time. If you do plan on kneeling though, I advise you invest in some gel knee pads. You can buy these at any hardware store, I bought some for €8 at a local DIY store and they’re fantastic, I use them for photographing basketball now as they just get destroyed on the soft ground outsides.
I like to agree with the phrase, “If your photo isn’t good enough, then go lower and get closer”.
Positioning
Now here’s the bit I could never find information about when I first started. Where should I position myself to get the best photos? Naturally a beginner’s reaction is to walk around the pitch and follow the play, this can be quite useful when you’re photographing something where you don’t have time to wait for the action to come towards you. For example, I photographed two cup games recently, they were both being played at the same time (a senior match and a junior match) and they were on pitches right beside each other. So I had no time to sit down and wait for the action to come to me, I had to capture some action so I was moving between the pitches to keep up with the action. Only in this kind of situation do I advise moving around, usually you’ll get better shots if you pick a position and stick with it. It’s very much like getting used to your first ever prime lens.
So, where should I position myself? Well, lets start with the obvious position:
Position 1: The Halfway Line

Surely by positioning yourself at the halfway line you’ll be able to cover all the action? Well… not really. Sure, you can get a photo of everything that happens, you can indeed capture anything and everything. But you won’t get very dynamic shots and you’ll hurt your chances of blurring the background unless you have an extremely fast lens. The easiest way to blur the background regardless of what lens you have is to have your subject as close to you as possible and have your background as far away as possible. By shooting across the pitch you’re restricting yourself to, at most, half of the pitch to separate your subject from the background. Whereas, if you were up by one of the try-lines you have the whole length of the pitch to put between your subject and your background, thus making it blur easier.
If you’ve ever watched a rugby match, which hopefully you have (if you haven’t, watch some before photographing rugby – the easiest way to make sure you get good photos, know the game), then you’ll know that the play usually moves across the pitch as the basic tactic is to push the ball out to the backs so they can make a dash up the touchline for the try. When you position yourself at the halfway line like this you’ll find that there’s a sweet spot in the middle of the pitch where you can get good photos, but very quickly the play will be too close to you or to far away from you to make good photos. You’ll start to cut off body parts if using a prime lens, lose the ability to isolate your subjects as you zoom out or lose your subjects in the background as they’re too far away to be isolated from it. I wouldn’t advise setting up in this position unless it’s for something very specific, I’ve found that this position is great for getting shots of players passing to each other, but that’s it.

Position 2: The 22m Line

Still not the best but indeed a much better choice than positioning yourself at the halfway line. This is a good position to start in if you don’t have a very long lens, for example, if you’re limited to a 70-200mm lens. This gives you a greater sweet spot in the middle of the pitch and improves your chances of capturing action as the players are moving towards you. Action rarely moves across the pitch so the further back you are towards the try line, the better your chances of getting clear shots of the players breaking through the opposition’s defence. This position, as I said, is good for people who don’t have very long lenses (or much patience) but it also offers some unique opportunities for closeups of lineouts and rucks. When you’re in a position like this you can very easily get low and look up at the players as they’re getting lifted for lineouts, this makes for a strong image showing the players as big as possible, you can use the sky as a background to remove any busy backgrounds you may have around the pitch.
It’s almost impossible to get shots like this without being close to the lineout. This position also offers you unique opportunities to capture static portraits of players, generally not very interesting photos but they’re a favourite among parents/family/friends, great for selling purposes!

Position 3: Behind the Try Line
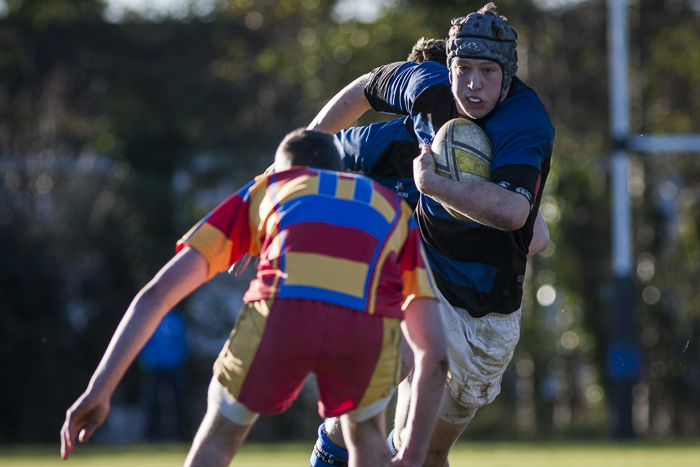
 Probably my favourite position, only because I don’t have a lens longer than 300mm. If I had a 400mm and/or a teleconverter I’d prefer position 4. This position offers many advantages but also has a coverage issue. Firstly, you’re in a great position to capture tries whether they’re close to you:
 Or far away from you, on the other side of the pitch:
 This position offers an even greater sweet spot in the middle of the pitch, which is ideal for isolating little bits of action to create good action shots. It works great for full body shots when they’re far away from you and it’s great for closeups when they come closer.

 However, unless you have a lens that reaches 300mm then you’re going to find your photos a bit far away so I’d recommend position 2 or a spot between this one and that one.
Another benefit this position offers is that you can clearly see down the touchline which can make for some great shots as players are being pulled out of touch.
 Two big drawbacks of this position are that you have to be patient and wait for the action to come to you. If you’re trying to photograph action that’s on the other half of the pitch then you’ll be disappointed with your images and feel the need to move closer to the halfway line. If you wait, the action will make its way to you, eventually. If you know the team well enough then you’ll know which side the players favour and you can therefore pick that corner to give yourself the best vantage point at capturing key moments as well as tries. The biggest drawback of this position is that you’ll have a fair bit of the other end of your tryline blocked by the posts and you’ll have a stupid corner flag in your way. If you’re photographing amateur games then it’ll luckily only be a flag but if it’s professional matches then you’ll be unfortunate enough to have a padded corner marker in your way which is significantly bigger, and therefore you’ll be better off with position 4.
Position 4: Behind the Dead Ball Line

Typically favoured by professionals shooting with 400mm lenses or longer, this position offers many advantages of being able to isolate your subjects (there’s a lot of distance between the subject and the background – the length of the pitch), pick out runs and capture any try from a dynamic position. Due to the posts you can’t really see the other side of the pitch before the try line but the coverage of the side you’re positioned on is brilliant. However, it does require even more patience if you don’t have a 400mm or longer lens.
 As the action is always coming straight towards you, you can get some fantastic shots of players straight on.
Position 5: Behind the Posts

I don’t particularly like this position, this is probably my least favourite out of all of them because I have yet to discover a real use for this position. It seems like it’s a good idea, you can see both sides and directly down the middle but when in action you realise that the posts block a lot of your vision. I was lucky enough to get one of my favourite photos in this position, I found it useful for getting in close to rucks but generally that can happen from any of the positions due to the frequency of ruck formations. This position, like position 4, is great for isolating your subject as you have the whole pitch between them and the background but that’s only when you’re able to get a clear view of your subject.

Conclusion
Position 3 and 4 offer the best photographic opportunities but require a reasonable amount of patience waiting for the action to come to you. The key moments you need to look out for are when players break away from rucks, scrums etc. Nothing is worse than a crowded photo. You can be positioned in the perfect spot to isolate your subject but if there’s too much going on in your frame then the image will still fall short. The better the quality of rugby you photograph, the easier it will be to capture these moments. In junior rugby all the players just crowd around the ball whereas in senior rugby they’re more spread out and it just makes your job much easier. Most action tends to happen close to the touchline as that’s where you’ll find the backs making their runs and you’ll usually get some good tackles occurring there, with little crowding around the ball. It’s important to have a good view of the centre of the pitch as that is where everything starts, the photos may not always be the the cleanest or most consistent but you’ll always get some good keepers. A good view of the tryline is also vital, especially if you want to capture those big moments for a publication or whatever.
Hopefully you were able to find that information helpful, if there is anything you want me to add in or consider looking at for my next guide (hockey) then please let me know. Thank you!

Interesting blog Stuart…I would also add the use of a monopod to help stabilise the camera and also to support the weight of the camera and lens. Like you, I favour positions 3&4. Position of sun can also an important factor in where you position yourself.
Yes, A monopod is a must.I take a folding seat and sit with my monopod at eye level so you never get tired arms.
this was very helpful!
Great insight into photograph rugby games very useful thank you very much
Stuart, thank you so much for this useful and very informative article. I have never photographed rugby before so I will try position 3&4 . Well done
Many thanks for spending the time and effort to share your knowledge with the rest of us. I particularly like your use of the diagrams. You have kept the equipment to a minimum and concentrated on the techneque. Great work.
Shooting rugby is my favorite sport to photograph…I think your info is spot on …but I do shoot from position 5…yes the posts get in the way sometimes……but when all things coming together the player with the ball lunges and extends his/her arms toward the try line as the opponent wraps up the ankles…and all just inside the post…makes for a splendid image . I do have one disagreement…your opinion is in the majority…but I like having lots of different things happening in the image…I think it tells a more complete story…but as to overall on this …well done !
Many thanks for your very informative post. I will be photographing my first rugby match in 2 hours time. I will use your advice.
Thanks, needed this for an upcoming shoot. Well done sir.
Alex Menendez
Very useful tips for people who don’t have long lens. Thanks
Good solid advice. Stuart. I’m usually at position 5 and I agree with your criticism this position. 3 or 4 probably are the best.
Great information! Thanks. Would your advice be different for 7s?
Thanks, Jess! No, I would consider the advice to be universal – the camera doesn’t affect your shooting experience that much, some minor adjustments may be made due to crop factors, lenses are the real factor that comes into play. But use this as a guideline and I’m sure you’ll find your own rhythm that suits you for your shooting style in no time :)
Thanks for this. I shot my first game of rugby a few weeks ago and read your guide a few days before. It helped immensely and I came out with a bag full of shots I, and the club, were happy with. I’ve just had another browse through before this Saturdays game. I have my own ideas on how to approach it, but its nice to have a little insight. Cheers.
Thank you very much for your post. I’m just a mom taking pictures at my kid’s club but your guidelines have been extremely useful!!